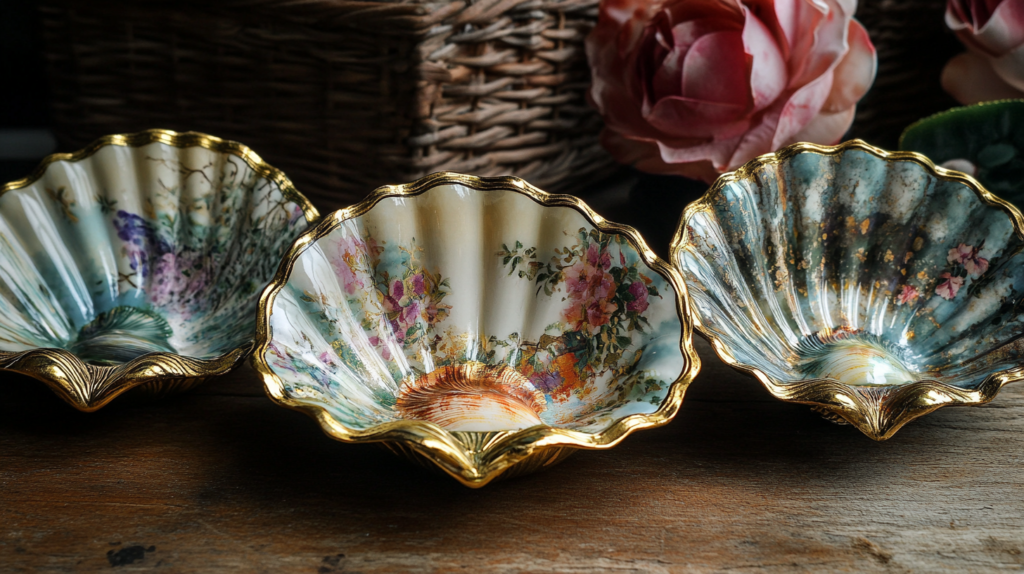
Creating decoupage scallop shell trinket or jewelry dishes with gold gilding is a beautiful and fun DIY project. Here’s a step-by-step guide on how to make them:
Materials:
- Large scallop shells (cleaned and dry)
- Decoupage glue (Mod Podge is a popular choice)
- Decorative paper napkins or tissue paper (for the design)
- Gold acrylic paint or gold leaf (for gilding the edges)
- Soft paintbrushes (one for glue and one for paint)
- Scissors or a nail file (to trim excess paper)
1. Clean and Prepare the Shells
- Why It’s Important: Scallop shells, whether collected from the beach or purchased, often contain sand, oils, or other impurities that can interfere with the adhesion of the glue and paper.
- How to Clean: Wash the shells with warm water and mild soap, using a soft brush to gently scrub away any dirt, especially in the crevices. Rinse the shells thoroughly and allow them to dry completely. Any moisture trapped in the shell can affect the decoupage process, leading to peeling or bubbles in the design.
2. Cut and Prepare the Napkin
- Choosing the Design: Select decorative paper napkins or tissue paper with patterns that fit your aesthetic. Popular choices include floral, coastal, or abstract designs that complement the natural shape and texture of the scallop shell.
- Preparing the Napkin: Most napkins have multiple layers. Separate the top printed layer from the backing layers. Tear the napkin into pieces that are slightly larger than the inside of your shell. Tearing instead of cutting helps the napkin blend seamlessly over the curves and ridges of the shell, as the torn edges naturally adhere more smoothly.
3. Apply Decoupage Glue
- Importance of Thin Layers: Apply a thin and even layer of decoupage glue (Mod Podge works well) to the inside of the shell. Using a thin coat of glue helps the napkin adhere better and minimizes the risk of wrinkles or bubbles.
- Tools: A soft, medium-sized brush is ideal for spreading the glue evenly. If the shell has dark spots or uneven coloration, you might want to paint the inside of the shell with white acrylic paint first. This will create a clean background for your napkin design, making the colors more vibrant.
4. Place and Smooth the Napkin
- Positioning: Carefully place the napkin over the glued surface. Begin by pressing it into the center of the shell and smoothing it outward to the edges. Use a dry paintbrush or your fingers to smooth out any wrinkles.
- Handling Wrinkles: Wrinkles are common due to the curved surface of the shell. You can use a small wooden stick or your fingers to smooth the napkin gently. If some small wrinkles remain, don’t worry—they often add texture and character to the finished dish.
- Avoiding Bubbles: To prevent air bubbles from forming under the napkin, work slowly and press gently. If bubbles do appear, use a brush to push them out toward the edges.
5. Remove Excess Napkin
- How to Trim: Once the glue is dry (usually after about an hour), remove any excess napkin by pulling it downward along the sharp edge of the shell. This will create a natural, clean tear. For a more precise finish, you can use fine scissors to trim the edges.
- Finishing the Edges: If needed, use a nail file to gently sand the edges, ensuring that the napkin conforms perfectly to the shell’s scalloped shape.
6. Seal the Napkin
- Why It’s Essential: A second thin layer of decoupage glue will seal the napkin, protecting it from wear and adding a slight sheen. Be careful not to oversaturate the napkin with glue, as this could cause the colors to bleed or the paper to wrinkle.
- Additional Coats: Depending on your desired finish, you can apply multiple coats of glue. Some crafters prefer a glossy finish, while others may opt for a matte look. Allow each layer to dry fully before applying the next.
7. Gold Gilding
- Adding the Gilded Edge: For a luxurious finishing touch, use metallic gold acrylic paint or gold leaf along the edges of the shell. A thin paintbrush will give you more control when following the shell’s scalloped outline.
- Layering: You may need to apply several coats of gold paint to achieve the desired opacity. Let each coat dry fully before applying the next.
- Using Gold Leaf: If you prefer an even more reflective and elegant finish, use gold leaf. Apply adhesive to the shell’s edge, place the gold leaf, and gently brush away any excess for a shiny, gilded effect.
8. Optional Display Enhancements
- Elevating the Shell: To enhance the look of your trinket dish, you can add small bases or feet. Wooden candleholders or faux pearls glued to the bottom of the shell are popular choices for giving the dish a polished, elevated appearance.
- Sealing for Durability: For added durability, especially if the dish will be handled often, apply a clear varnish over the entire shell. This will provide additional protection and help the dish last longer while adding a glossy finish.
9. Finishing Touches
- Once all layers of glue, paint, and varnish are fully dry, your decoupage scallop shell trinket dish is ready to use or display. These beautiful handmade dishes are perfect for holding small items like jewelry or keys, and they also make lovely gifts.
This process ensures that every step is carefully crafted to create a stunning, personalized trinket dish that is both functional and decorative. These unique pieces blend elegance with creativity and can be customized to fit any style or occasion.


